Unleash Your Creativity With The Ultimate Recipe For Gelli Plate: A Fun And Easy Click To Action Guide!

Recipe for Gelli Plate: Explore Your Creativity in Art and Cooking
Introduction
Hello, Cooking Enthusiast! Today, we’re going to dive into the exciting world of gelli plate recipes. Gelli plate, also known as gel printing plate, is a versatile tool used by artists and crafters to create unique prints and textures. But did you know that this gelatinous surface can also be used in the kitchen? In this article, we’ll explore the recipe for gelli plate, its ingredients, instructions, serving suggestions, techniques and tips, and more. So put on your apron and let’s get creative in both art and cooking!
2 Picture Gallery: Unleash Your Creativity With The Ultimate Recipe For Gelli Plate: A Fun And Easy Click To Action Guide!
What Is a Gelli Plate?
A gelli plate is a gelatinous material that can be used as a printing surface for creating unique textures and patterns. It is made from a combination of gelatin, glycerin, and water, giving it a jelly-like consistency. Artists and crafters use gelli plates to make monoprints, collage backgrounds, and other mixed media projects. But the fun doesn’t stop there! Gelli plates can also be used in the kitchen to create edible masterpieces.
Who Can Use a Gelli Plate?
Image Source: pinimg.com
Anyone can use a gelli plate, regardless of their artistic or culinary background. Whether you’re an experienced artist looking to experiment with new techniques or a home cook looking to add a creative touch to your dishes, a gelli plate can be your new best friend. It’s a versatile tool that allows you to unleash your creativity in both art and cooking.
When Should You Use a Gelli Plate?
A gelli plate can be used anytime you want to add texture and visual interest to your artwork or dishes. Whether you’re creating a beautiful landscape painting or whipping up a delicious dessert, a gelli plate can take your creations to the next level. So whether it’s a lazy Sunday afternoon or a special occasion, grab your gelli plate and get ready to create something amazing.
Where Can You Get a Gelli Plate?
Image Source: ytimg.com
Gelli plates can be purchased at art supply stores or online retailers specializing in art and craft materials. They come in various sizes, so you can choose one that suits your needs. If you’re not ready to invest in a gelli plate just yet, you can also make your own using a simple recipe that we’ll share with you later in this article. So no matter where you are, a gelli plate is within your reach.
Why Should You Use a Gelli Plate?
Using a gelli plate in your artwork or cooking can add a whole new dimension to your creations. The gelatinous surface of the plate creates interesting textures and patterns that can’t be achieved with traditional tools. It allows you to experiment, play, and let your imagination run wild. Plus, using a gelli plate is a fun and interactive way to express yourself and unleash your inner artist or chef.
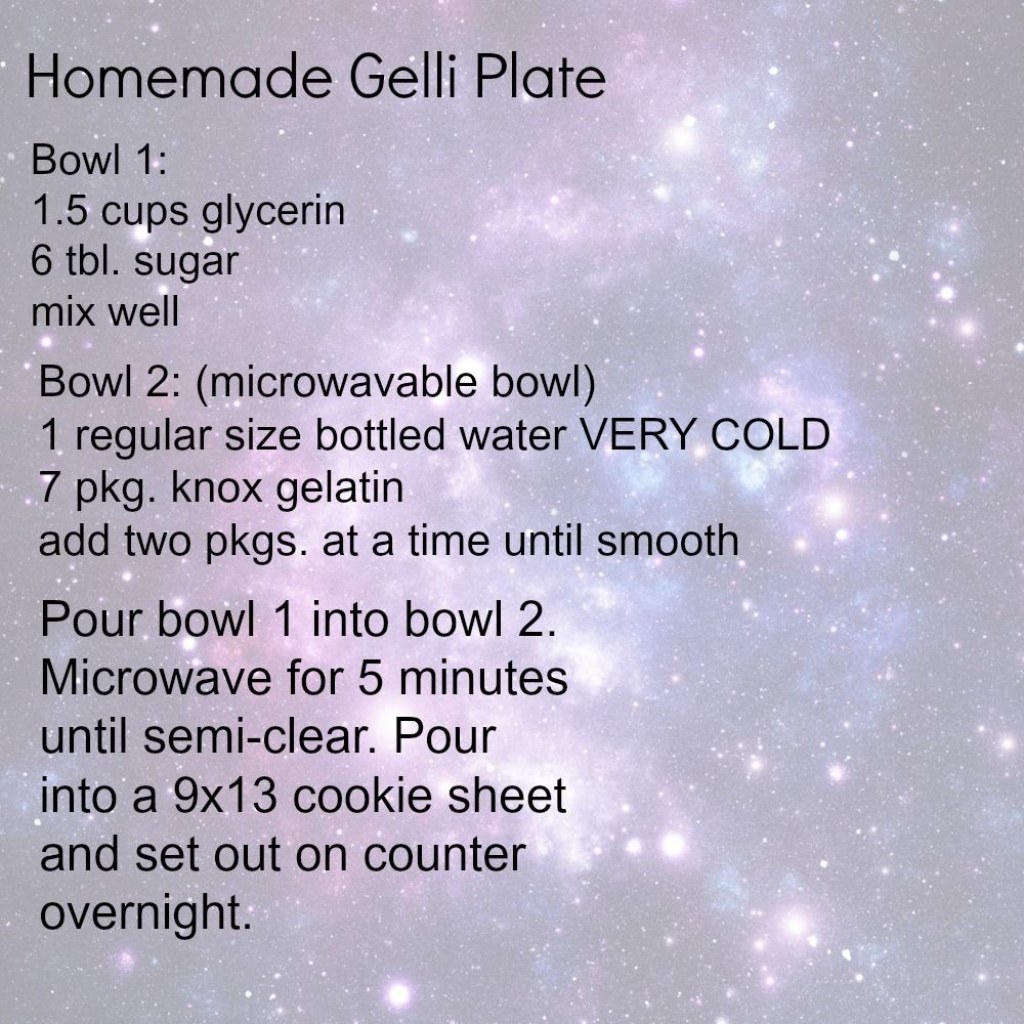
Ingredients
1. Gelatin powder: 2 tablespoons
🥄
Gelatin powder acts as the binding agent in the gelli plate recipe. It helps give the plate its jelly-like consistency and holds all the ingredients together.
2. Glycerin: 2 tablespoons
💧
Glycerin is added to the gelli plate recipe to prevent the gelatin from drying too quickly. It helps keep the plate soft and pliable, allowing for better print quality.
3. Boiling water: 1 cup
🔥
Boiling water is used to dissolve the gelatin powder and create the gelatin mixture for the gelli plate. Make sure the water is hot enough to fully dissolve the gelatin.
Instructions
1. In a heatproof bowl, combine the gelatin powder and glycerin. Mix them together until well combined.
🍽️
Using a heatproof bowl is important as you’ll need to pour boiling water into it later. Make sure the bowl is large enough to hold all the ingredients.
2. Gradually add the boiling water to the gelatin mixture. Stir continuously until the gelatin is completely dissolved.
🌊
It’s essential to stir continuously to ensure the gelatin is fully dissolved and there are no lumps. This will result in a smooth and even gelli plate.
3. Allow the mixture to cool slightly, then pour it onto a flat surface. You can use a baking dish, cookie sheet, or any other flat container that’s easy to work with.
🍽️
The flat surface will serve as the base for your gelli plate. Make sure it’s clean and dry before pouring the gelatin mixture onto it.
4. Let the mixture set for about 2-3 hours, or until it becomes firm and jelly-like to the touch. You can place it in the refrigerator to speed up the setting process.
❄️
It’s important to let the mixture set completely before using the gelli plate. This will ensure that it’s firm enough to hold its shape and produce good prints.
5. Once the gelli plate is set, it’s ready to use! You can now start creating beautiful prints and textures by pressing various objects onto the plate and transferring them onto paper or other surfaces.
🎨
Let your creativity run wild! Experiment with different objects like leaves, stencils, and textured fabrics to create unique prints and designs. The possibilities are endless!
Serving Suggestions
1. Use your gelli plate prints as decorative elements on cakes, cookies, and other desserts. Simply cut out the prints in desired shapes and sizes, then place them on top of your treats.
🎂
Adding gelli plate prints to your desserts will instantly elevate their visual appeal. It’s a simple way to add a touch of artistry to your sweet creations.
2. Create edible art by using your gelli plate prints as a canvas for food. Arrange the prints on a plate and place your dishes on top of them, creating a visually stunning presentation.
🍽️
This serving suggestion allows you to combine art and food in a unique and creative way. It’s a great conversation starter at dinner parties or special occasions.
3. Use gelli plate prints to decorate homemade chocolates or candies. Place the prints inside molds before pouring in the melted chocolate or candy mixture. Once set, you’ll have beautifully designed treats.
🍫
Adding gelli plate prints to your homemade chocolates or candies adds a personalized touch. It’s a fun and creative way to make your treats stand out.
Techniques and Tips
1. Experiment with different textures and objects to create unique prints. Try using leaves, lace, bubble wrap, or even your fingertips to add interesting patterns to your gelli plate.
🌿
The beauty of gelli plate printing lies in its versatility. Don’t be afraid to step outside the box and explore different techniques and materials.
2. Apply different amounts of pressure when transferring prints onto paper. Light pressure will result in a delicate and translucent print, while heavy pressure will create a bold and opaque print.
🖌️
Playing with pressure allows you to achieve different effects and styles in your gelli plate prints. It’s all about finding what works best for your artistic vision.
3. Clean your gelli plate after each use to maintain its quality and longevity. Use warm, soapy water and a soft sponge or cloth to gently remove any ink or paint residue.
🧽
Proper maintenance is key to ensuring your gelli plate lasts for a long time. Taking care of it will result in better prints and a more enjoyable creative experience.
FAQ
Q: Can I reuse the gelli plate mixture?
A: Unfortunately, the gelli plate mixture is not reusable. Once it’s set, it cannot be melted down and reused. However, you can always make a new batch of the mixture whenever you want to create more prints.
Q: Can I use food coloring or edible ink in my gelli plate prints?
A: Yes, you can use food coloring or edible ink to add color to your gelli plate prints. Simply mix the coloring with a small amount of water and apply it to the plate before transferring the print onto paper or other surfaces.
Q: Can I use my gelli plate for both art and cooking?
A: It’s not recommended to use the same gelli plate for both art and cooking purposes. It’s best to have separate plates for each use to avoid cross-contamination of materials and ensure food safety.
Q: Can I store my gelli plate in the refrigerator?
A: Yes, you can store your gelli plate in the refrigerator to keep it fresh and extend its lifespan. Make sure to place it in an airtight container or wrap it tightly in plastic wrap to prevent it from drying out.
Q: Can I make a larger or smaller gelli plate?
A: Yes, you can adjust the size of your gelli plate by simply adjusting the quantities of the ingredients. If you want a larger plate, increase the amounts of gelatin powder, glycerin, and water accordingly. For a smaller plate, decrease the amounts.
Conclusion
Now that you’ve learned about the recipe for gelli plate and its many creative possibilities, it’s time to unleash your inner artist and chef. Whether you’re creating stunning prints for your art projects or adding artistic flair to your culinary creations, the gelli plate is a tool that will inspire you to think outside the box. So gather your ingredients, follow the instructions, and let your creativity run wild. Get ready to impress yourself and others with your unique gelli plate masterpieces!
Remember, the journey doesn’t end here. Feel free to experiment with different ingredients, techniques, and ideas to make the recipe for gelli plate truly your own. Share your creations with others, seek feedback, and continue to grow as an artist and chef. The possibilities are endless, and the only limit is your imagination. So go forth, have fun, and create something amazing with your gelli plate!
Final Remarks
Disclaimer: The recipe for gelli plate presented in this article is meant for artistic and creative purposes only. While the ingredients used are generally safe for consumption, please note that the gelli plate is primarily intended for art projects and not food preparation. Use caution when using the gelli plate in the kitchen and ensure that proper food safety practices are followed. The author and publisher of this article are not responsible for any adverse effects or consequences resulting from the use of the gelli plate in cooking or food preparation.
This post topic: Recipe


